Ophidian
Enemy Production for Viridian


For the Ophidian enemy, the first big stretch was to sculpt a detailed high poly. I broke the form up into the head, the body and the tail, using symmetry to make sure that the body piece can repeated over and over to create a longer body.


The concept art for this creature included this 'wings' that span out from the length of the body. I spent quite a while thinking about how I might build these and gave it a few goes. but ultimately I need more time to properly plan this piece, as it not only needs to keep a low poly count, it also needs to be rigged and weight properly in order to deform naturally as the wings are animated spreading out from the form.
For this reason, this feature has been pushed to 'stretch goal' priority, and I'll be tackling these once the prioritised work on the main enemy form and player character is complete.
Retopology on the character was really simple, as the head is the only complex piece of the puzzle, and the body and tail simply required extruding faces down along the length and making cuts along them that would allow for the silhouette to resemble the high poly.


For the body piece to tile successfully, I used symmetry on both the X and Z axis, so each end was identical. This was the verts would line up perfectly, making a seamless join. I used this very edge row of face on the body-end of the head and tail also, giving them this seamless join as well.
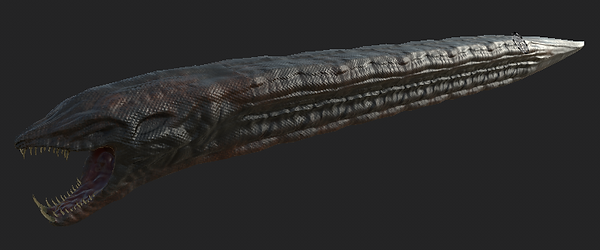
The entire creature, including eyes, teeth and body piece duplicates comes out at 11,544 tris.


With retop complete, I built up the full form using duplicates of the body piece and did the same with the high poly, then pulling this back into ZBrush just to sculpt over where the seam was showing slightly on the high. And with this done, it was onto baking.

Pre-bake
Post-bake


I created a base that would be used across all the different types of this enemy. This included a tooth and mouth-innards texture, as well as a layered scale and diamond-plastic materials that come with Substance painter. I made sure these only affected the normal/height and roughness, and stacked them with masks to add some variation to the scales.
The above image shows how I organised my layers into folders to keep track of the different enemy types. This would also make it easier to export them later on.


For each of the variants, I used a fill layer of colour for a base for the scales, then a shadow version of this to add some more ambient occlusion to tighter areas on the mesh.


This was then followed by a layer of the enemy type colour that was much more vibrant, painting this in with a black mask. The brush type used for each type varies to fit with the type better. For the stun and poison types, I used a vein like brush, for the blood type I used a much smoother brush and decreased the roughness. I also painted some of this colour on the tip of the teeth, where appropriate.


For the flame type, I used a dirt brush, with increased roughness and an almost-black colour to make it look as though it was charred and covered in soot.

For the flame type, I used a dirt brush, with increased roughness and an almost-black colour to make it look as though it was charred and covered in soot.

On top of each type's layers, I added a passthrough layer that increased the contrast and luminosity of the layers below, as, in the game's lighting, the snake texture was quite dark and it was hard to distinguish between the different types.

To create a final texture for the eyeballs, I used a piece of iris photography found here:
I then made changes to this image in Clip Studio, as the pupils facing right out made the Ophidian look cross-eyed, but the eyeballs was not intended to move so I couldn't just spin it, as it was not a complete sphere at the back.

I'm still learning how to render in Arnold, so the renders of this character build aren't the best, but I wanted to showcase the full build for your viewing here.